The Quest for the Ultimate Bicycle
I've always liked bikes, as long
as i can remember i've enjoyed riding
them, whether they were BMX's, Racers, Mountain bikes/ATB's or whatever.
Bicycles are
-as most people know- a great form of transport, the city
where i live they are
essential. In
fact in most of the Netherlands and a lot of other countries it is
extremely environmentally conscious, handy and cheap to own
and use a good bike.
One aspect of bikes i did not
enjoy (especially
when i was a teenager and younger) was the seemingly endless and
sometimes incomprehensible maintenance and repair work (toil?) that
appeared integral to owning and using a bike. Every bike owner must do
repair
and maintenance unless of course one happens to have truckloads of
money
to pay a professional to do it. It tends to be relatively expensive
in Western countries to have a professional repair your bike,
especially if your income is low.
Fortunately for me, when i was about twenty i ended up living in a
squat with an individual (Grima) who worked as a 'true' bike
repairman
for years. The knowledge of this person was vast and he was always glad
to patiently share it. During a year or two i picked this guys brain to
acquire
as much knowledge as i could. I asked a million questions and
subsequently learned a
great deal from Grima,
including a type of (Zen) philosophy as far as bikes are concerned.
Grima had
engaged in a lot of thought and experimentation in his efforts to
assemble a "perfect" bike for his needs. Of course there is no such
thing as perfection and what makes a bike good is a very personal
thing. To quote Robert M. Pirsig, the author of that modern classic
"Zen
and the Art of motorcycle Maintenance"
:
"And what is good, Phædrus,
And what is not good...
Need we ask anyone to tell us these things?"
Even so, when i came to understand what Grima had wrought and
particularly when i rode his bike, i realized his machine was near
perfect for my needs too! In this piece i try to impart some of the
wisdom he so generously shared with me. Maybe some of you totally
disagree, maybe it helps others... either way please remember this
piece just represents my opinions, nothing more and nothing less.
If you see text
colored as this one
is this means that the text in question was lifted (with permission)
from an excellent site written by Bryan, another bike aficionado:
http://www.battewell.freeserve.co.uk/bike.html
His extensive site contains some excellent information on many aspects
of bikes most of which is not repeated here... I also used a few of his
graphics on this page.
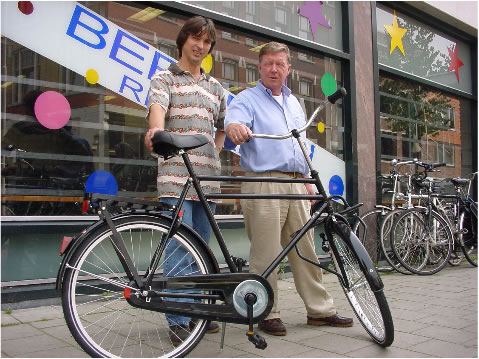
The "ultimate" bike (for my needs and Grima's as well) would have to
meet the
following criteria, in order of importance from high to low:
1-Durable/Practical/Comfortable
(These are often closely related)
2-Low and easy Maintenance
3-Customizable
4-Lightweight
5-Theftproof
6-Standardized
7-Versatile
These Criteria entail:
1. Durable
and Practical. Quality
parts, i go into many of these these later.
2. Low Maintenance. Again quality parts and great materials
that don't rust or
wear out quickly. This usually means the higher end variants of
stainless steel, aluminum and
other high grade alloys. All the parts must be easy to fix and replace
as well. Having to toil for half an hour to remove your back wheel for
example is ludicrous and can be easily avoided by the parts and systems
you
select. Because of my choice of parts and how they are mounted my
back wheel is out in about 1 minute maximum and i need to employ only
one
common tool, a spanner, very briefly.
3. Customizable. In many respects the same as 2.
4. Lightweight.
Ditto
5.
Theftproof, as far
as this is possible, there is no such thing as a totally theftproof
lock or
even locks, there is just bad, ok, good and best ones. A good
lock will cost you E 40 or more. Much better is to have two or more locks. Parking your bike next to a "nicer"
( = flashier, more tempting and easier to
sell) bike with worse locks is also a good but slightly weird tactic.
As it is i value my bike way too much to risk it too much. In any case
i never park
it
overnight near places that are known for their bike theft (Central
Station, "Bad" neighborhoods etc.). In fact i have a cheap back-up fold
up bike which i use on the rare but for me unavoidable situations when
i need a bike that isn't too valuable.
Theft is not the only concern: vandalism is best avoided by common sense and having a bike that doesn't "stick out" in certain ways.
In striving to make my bike less attractive for would-be-thieves and
vandals i've
made sure it's appearance is both unique (easier to spot/recognize and
thus
harder to sell) and unassuming. When the average person looks at
my bike there is almost no way for them to tell that it is an amazing
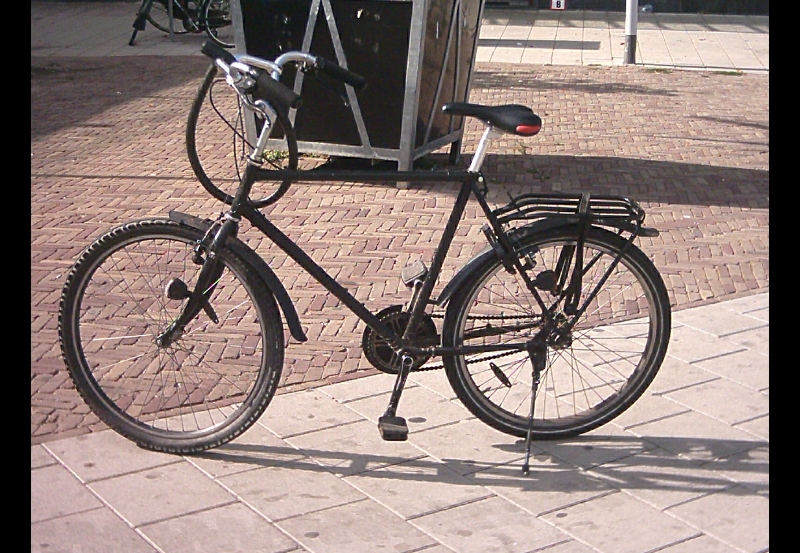
and valuable machine. My bike is painted
matte black, there are no brands to be seen anywhere and it takes a
very knowledgeable
and interested person to see the quality and inherent value of all it's
components.
6. Standardized. The parts must be easily
attainable/replaceable. When possible i've included really good parts that can be cheaply
obtained by scavenging the Dutch streets or buying them second hand. If
you
wish to scavenge, it is is usually advisable to set your sights on
obtaining parts that are one or two generations older than what is the
current trendy standard. These older but often very good parts are
much more abundant on the streets than the latest fad.
7. Versatile. The bike must
handle all kinds of terrain and tasks. Because of it's make up my
bike handles very well in sandy areas as well as smoothly paved bicycle
paths.
Because of my very specific baggage carrier I can carry someone on the
back that weighs a 100 kg with no problems. I can bike very fast by
leaning comfortably forward and holding the special bar ends or i can
relax & cruise for hours by sitting upright and employing the
standard handle
bars.
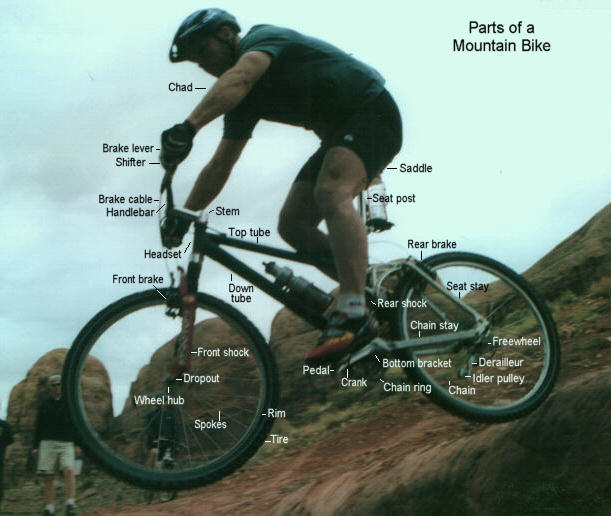
A normal store-bought mountain
bike (with 18, 21
or more gears, studded tires, hugely oversized parts, no mudguards and a straight
handlebar) is a ridiculous premise in the Netherlands. In fact
it is ludicrous anywhere unless you happen to have access to seriously
hilly,
extremely wild unpaved terrain
that you enjoy biking in regularly.
The folly of a "Mountain Bike" (also called ATB's) in the "Low Lands"
is self-evident in
those names. There are no mountains in Holland! Mountain bikes have
handlebars that are actually very anatomically and ergonomically
incorrect, they are handy for a lot of control (needed if you are going
60KpH down an unpaved Mountainside) but useless for sustained and
comfortable riding
in urban areas.
Just think about it, when you comfortably walk, rest or
whatever, how are your hands angled in relation to your legs...? Now
imagine twisting your hands 90 degrees inwards so your knuckles point
forward. Now imagine holding them in this position and then doing
any engaged physical activity for more than a minute..... not good!
People are
not
build like robots or Apes (at least most of them). My experience and
opinion is
that straight handlebars are uncomfortable, promote a shitty (riding)
posture and give me pains in the shoulders. Of course tastes differ and
some people may
actually dig them...
Another pet peeve i have about
the average mountain bike are the ridiculously oversized parts such as
handlebars, frame, and seat post. I don't know about you but i have
never, ever broken any of these parts, even on shitty bikes. And, i
need
the shameless overpricing, non-standardization/incompatibility and
added
weight of chunky oversized parts like a need a shotgun blast to the
face. In quite some bikes the oversized frame tubes are
thinner walled to reduce some of the weight added by all that
chunkiness, this
actually makes these tubes much more vulnerable to impact damage! And
don't get me started on some of the ridiculous mountain bike frame
designs and shapes i've seen.
Again, unless you are a professional or avid amateur downhill mountain
biker, avoid these bikes and parts like the plague.
My frame is actually an old Peugeot mountain bike frame that was made
some years before the "over sizing" hype. Batavus, Gazelle, Giant
and quite some other brands also made some good, strong and simple
frames
back in the early days of mountainbikes. Often these frames can be
found or bought second hand
at very low cost. When buying a second hand frame make sure you know
what you are doing (size, worn out moving parts, accident damage,
versatility, compatibility
etc).
To give you a better idea of how my bike is made up i am going to give
you and overview starting at the front:
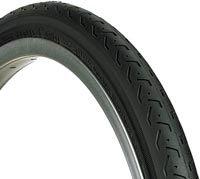
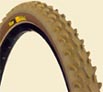
Front wheel. The tire is wide
and high (has a very large air chamber),
the rubber is thick. As a result i have
NEVER (yes i do Mean NEVER) gotten a puncture by riding this bike on
the streets and the tire lasts very long. Despite sustained use of these tires
for
about three years running i have not yet needed to mend nor replace
them.
I prefer nearly slick 26 Inch (1.9 or
wider/thicker) tires with a real thick rubber tread by
good brands such as Schwalbe or Vredestein.
A
wider/higher tire means a slightly
larger
circumference which makes for slightly faster/easier biking. Such a
tire also means the wheel has a lot of air cushioning and can take a
lot of
abuse without
buckling or warping. Although it is never advisable to do, i sometimes
smash into curbs, carry large friends and jump of things, so far as i
can tell i've
never even come close to damaging my wheels. This also has to
do with the fact that i keep the spokes well tensioned (where necessary
add a bit of tension, i do this is about once every year or even less).
When you have tires with a
large air chamber it is handy to have a pump or little device which
indicates the internal
pressure, you'd be amazed how much air these tires hold. Keeping tires
at their optimal pressure is very important but i guess that is a well
known fact.
Tires are really the last thing you want to scrimp
or save money on. There is nothing more annoying than riding on shitty
worn-out tires which give no grip and get punctured every two weeks.
When you do have old and crappy tires you can be sure that due to many
punctures fun and
worthwhile maintenance will turn into frustrating, unnecessary
and repetitive toil.
Studded tires
are very useful in thick and wet mud, on paved streets however they
slow
you down in corners, make a lot of noise and actually have less grip
than fairly slick tires.
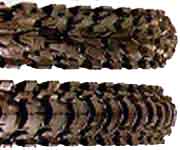
Hmmm... these
tires are more than a bit silly methinks
Both my 'Mavic' rims are of the reinforced double walled aluminum variety and have with double nickel plated brass eyelet's to reinforce the spoke holes. I personally prefer the widest of mountain bike rims, these work better with my tires.
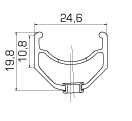
They were actually designed for
downhill mountain biking and in this case the extreme strength and
design doesn't mean they are heavy or that they have other drawbacks.
They
are actually very light as well as very functional for my needs. Rims
are definately not components you try and save money on either. It will
only
result in more damage, hassle and costs in the future.
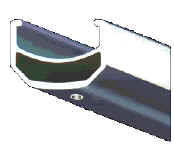
These days 'V' or triangle shaped rims are very popular:
I don't have much experience
with these but they are supposed to be very aerodynamic and strong
which makes sense, they seem quite good. However there is such a thing
as a wheel or bike
which is too stiff and hard. A bike needs to absorb shocks and give a
little if it is to be comfortable as well as strong.
My front wheel i found on the street, which was very
fortunate. It is an excellent Mavic aluminum and stainless steel wheel,
although i did replace the axle
and bearings. I did this because the old axle had a quick release
system which is very prone to theft. I am not a professional bike racer
either, i don't need a quick release system in order to save 10 seconds
when i sporadically remove my wheel. Especially since these
quick release axles/hubs are more vulnerable to damage and
theft.
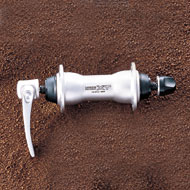
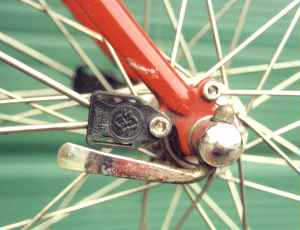
= quick release axle front and back (scope the levers and skinny inner
axle).
The back rim i bought and then i laced in some amazing spokes (a gift
from Grima)
and a three speed, freewheel Sturmey Archer Hub. A three speed hub
gear or epicyclic hub, with its
wide
chain and near perfect alignment between chain wheel and cog, should
give a much longer service life than the very best 27 speed derailleur
set up. In the not too distant past most utility bikes were fitted with
Sturmey
Archer 3 speed hub gears in their rear wheels. In many parts of the
world these hubs still abound especially second hand.
The hub gear has the
advantage that all of its moving parts are in a sealed hub, away from
the elements while the wide chain can easily be protected by a
chain case - as it does not have to traverse a large number of cogs.
This results in a virtually maintenance free set up, where the various
elements can be expected to last for many years. A further advantage of
hub gears is that you can change gear with the bike stationary, no more
being caught in top gear at the traffic lights! You can now buy 3, 5, 7
and 14 speed hub gears and I would suggest that this is by far the most
sensible solution for a utility or commuting bike. If you buy an older
commuting bike in Holland chances are it will be fitted with a hub
gear. Hub gears are a bit heavier than derailleur gears, and they do
not provide as much range or as many gears, but they last and last and
you don't have to waste your time looking after them. The only downside is that if the
internal gearing system does finally break down it
is
relatively hard to get to and fix.
Additionally good quality derailleur sets are usually very costly to
replace while my particular hub with gears can found
on the Dutch streets as a matter of some routine. However it is almost
unheard of to find a ready made 26 Inch mountainbike (rather than
utility bike)
wheel with a hub gears and i strongly suggest
you don't try lacing and constructing a new wheel yourself without
expert
help. It is not truly hard but you need some special tools and inside
knowledge.
If you do want to learn this skill (or a veritable plethora of other bike repair, maintenance skills and knowledge) you can't go wrong with another great and huge site namely:
The nice thing about making your own wheel is that the
skills and tools you acquire enable you can to easily fix warps and
bends should they
ever occur.
Brakes. Another very important component, i prefer the simple old
school
canti-lever ones of the more classy Shimano series. I found them on the
streets three times over, they are all over the place. I am no fan of
the currently popular V-brakes, they seem unneccesarily complex and
don't add anything in the way of necessary functionality unless you
need extreme braking power (downhill mountainbiking again) or have
shockabsorbers.
 -Cantilever
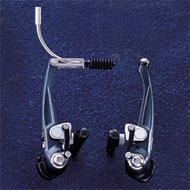 -.......
V-brakes
-.......
V-brakes
(the
cable pulls straight up at the center)
(the
brake cable curves and
pulls along the side)
Mudguards, the cheap set
(available everywhere) i employ is made from rubbery black plastic.
They
are
very durable, wide, and can take a lot of abuse. The back one could be
a bit longer, i am thinking about extending it as well as adding
a mudflap to the front one. I live in a rainy country.
I have a "Red Alert" signal light mounted
on the front and
the back of my bike. These are LED lights that need no batteries or
dynamo, ever. Every time the little magnet attached
to my wheel makes a revolution and passes by the light (without
touching) some electricity is produced and the light flashes brightly.
Red
Alerts are always on so you will never forget them and never be fined
for not having lights. They are not cheap but will last very long
indeed. They also give very little resistance when you cycle and can be
seen extremely well by others. They are only suitable to be seen with,
not
to
see
by. But this does not
matter to me since i personally almost never bike at
night in places where there is no street lighting.
One thing which is a pity is that the placement of these lights makes
them somewhat vulnerable, they sometimes get knocked a little out of
alignment. This means you
may need to quickly manually adjust them now and then. Either that or
be carefull when you park your bike against other objects. I am
thinking about making a little addition to protect them.
Steering
Wheel: Batavus, bought
new and cheap at a bankruptcy Sale. The bar is
curved in such a way that your posture is anatomically and
ergonomically correct. Standard sizing all over, very comfortable,
doesn't rust.
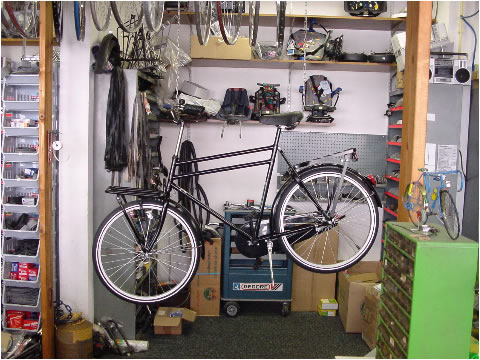
Everything which i have mounted on the handlebars is mounted in such a way that i have very easy access (both operation and repairs) and am still able to turn the bike upside down. When a bike is in a stable upside down position this enables one to conveniently work on it. The only better way i know of positioning a bike for repairs is to hang it up so the steering wheel is about 30 cm below eye level.
On the handlebar i've mounted some bar ends (gift) which serve a
variety
of purposes. I can hold them/lean part of my upper arms down on them
when i am biking fast/long
distance, this gives me a similar posture as you would get on a time
trial racer. They also give me some alternative grips and they
sometimes come
in very handy when transporting goods.
The
handlebars
have
cheap black foam grips which are soft and very comfortable. Yes they do
get wet and take up some water, but this doesn't bother me since i
always wear gloves when i bike in the cold and rain. When i lean
forward and grab the bar ends i put my elbows on these soft grips.
I bought the grips at Halfords. To make sure these grips never slip
whatever the wheather condition i put one layer of slightly rough tape
on my handlebars.
There is also a 3 speed Sturmey Archer shifter on the
handlebar, this
operates my
three gears. Found it on a wreck, removed the conspicuous brandname.
Bell: Cat's Eye, not very cheap
but
great simple design and thus VERY durable, very loud (also when it is
wet) or quiet
depending on how you flick it. Nice.
The brake handles are of the old
school
aluminum mountain bike stock, large (can't slip off them easily or miss
them in
an emergency) light and very durable. Easy to operate and thread with
brake cable. Found these on a wreck.
My outer brake cables are the simplest variety which can be bought of
the roll at most bike stores for almost nothing. They do the job just
great. I've never needed the 'teflon coated neon colored carbon
reinforced E 5.00 per meter' variety.
-A simple stainless steel inner brake cable
My inner brake cables are
Stainless
Steel, they are very strong and cheap. Again Halfords. About once or
twice a year i take them out and grease them liberally.
They operate much better and last a lot longer that way.
My pedals i
scavenged, used to be by Batavus, very wide and flat. The latter
enables
me to spread out the pressure over my foot and to even bike
bare-footed. It sucks and is painful when you slip of or 'miss' you
pedal because it is too slick or small. I've covered the pedal surface
with grip tape since i know from skating that grip tape is very grippy
even
when it is wet and a bit dirty. Grip tape i got for free at my local
skate store.
Recently i acquired some
BMX style (but bigger)
pedals which provide good grip and are very sturdy, they were about E
20.
My half open chain guard i
recently bought new since the old chain disk that is visible on the
old picture was very vulnerable and worked it self loose a lot.
This chain gaurd is very
simple and cheap, made from rubbery plastic
which bends rather than breaks. Old-school so not many stores carry
them, you can probably find them if you look hard though. I really need
a chain
guard to protect my baggy pants from grease and sharp cogs. Mine is
unlike most chain guards which are horrible because they tend to move
around/interfere with the moving parts, mount only on very specific
bikes and make for astounding hassle when taking out the back wheel.
Avoid the old school fully closed guards, they really stink.
Chain, wide and thick.
I clean it quite rarely and grease it often, these
are very small and quick jobs with great benefits.
-A Three cog and Crank Assembly
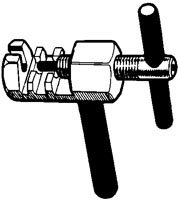
Cranks, same applies to them as to the saddle post in regards to
greasing and 'rotting' (see below). They are very thick and strong but
light
aluminum, scavenged. If you buy them, the cheapest by a reputable brand
will do just fine. I've never bent or broken a crank of this type. They
can
very easily be found on wrecks but you need a special tool (crank
extractor,
about E 8) to remove them. http://www.utahmountainbiking.com/fix/crank2.htm
-explains how it is done.
 -A crank extractor
Cog(s). Durable steel ones
instead of very fast wearing aluminum. I've implemented the ratio of
the front and back cog in such a way that my most used gear is very
well suited to the speed i usually bike at. The picture of the cog and
crank assembly is incorrect in
that i only have one cog in the front, i don't need any more.
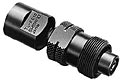
Saddle. I've actually replaced
my saddle quite a few times in order to find one i really liked. My
current one is flat-topped/level, with great springs but still firm.
Unlike banana topped/shaped saddles i can ride it comfortably in almost
any posture. The springs are very necessary in order not to get jolted
by the terrain. Got my saddle for free at a bike store, It was a
slightly damaged second hand. When you see this type of stuff lying
around always ask!!
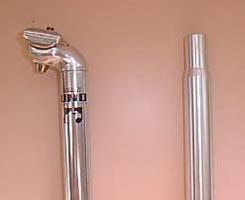
New Type
Old type
The saddle tube (seat post) is of the new school aluminum type (seen on
the left hand side of the picture) whose mechanism doesn't usually end
up
wearing out and
allows for easy adjusting of the saddle pitch and forward/back location
relative to
the frame. The old-school saddle post on the right has several
drawbacks in my mind.
Here too i replaced the quick release mechanism by a
simple & cheap bolt and nut setup, this makes it way harder for
people to rip off my tube and saddle.
Unfortunately
this sort of thing is not at al rare in the Netherlands.
It is very important to
thoroughly
grease the tube before sliding it in the frame, being aluminium it
doesn't rust as such but without greasing can
'rot' in a way that makes it nearly impossible to remove
without
damaging the bike.
In
fact when i asked Grima what his number one tip was for mountain bike
building, repair and maintenance he said: 'Grease!! Very
liberally grease
everything that
easily
(re)moves or has thread !!! If you do not
certain parts may rust and rot in place which in bad cases could
severely cripple and mess up your bike.'
I've experienced what he was talking about first hand and it really is
lousy, i've damaged bikes and parts trying to rectify a simple error
which i
didn't even know i was committing.
The
parts Grima was referring to in particular are the pedals, the cranks,
the saddle post and the steering post. To not grease these when you
mount them is sheer folly.
Front/main lock. This used to be a 'Buffo' (brand) which i always put through the front wheel, frame and a lantern post or other strong and fixed object. It lost my first Buffo but not untill it had worked perfectly for over five years. If you buy one make sure you get the longer/thicker variant. These locks retail for about E 25, don't get cheap imitations, they suck ass. The real one is very durable.
I recently read an authorative test of bike locks and to my horror the Buffo lock came out bad indeed. I quickly went out and bought the best tested lock. At E 34 this was quite an affordable Abus hardened chain. Very strong and convenient so far. I've yet to test it but i reckon locks make good weapons against aggressive car drivers too ha ha.
I really recommend reading the aforementioned Dutch test at www.fietsersbond.nl, the "Ranglijst gehard stalen kettingen" (Ranking of hardened chains) is of particular interest. Remember: before you buy any locks as there are so many bad ones for sale and the best ones are not even that expensive. But you can't really tell the difference by looking! And many bike store owners will sell you almost anything...
Back lock. I have always used
the
'through the wheel' variety by Abus
or AxxA in addition with my main lock. Durable, simple, hardened and
affordable. I almost never use solely the back lock since a thief can
easily carry off your bike and trash the lock at his leisure. I
upgraded this lock to the latest and much better model, the Axa SL-7.
The SL-9 is even better but can't be mounted on my bike. So basically
for
E 50 i had some of the best (and
according to the test most feared by thieves) locks on the market. A
worthwhile investement i think.
My old The baggage carrier is of a variety that was and is often found on older Batavus bikes. I bought mine second hand for E 2.50 and it is amazing. Incredibly strong and durable, this is mostly due to it's design and shape. With a bit of luck you should be able to find this carrier second hand or on the street. When you look at it from behind it is shaped like and 'A', this A-frame rather than an 'H' frame makes for a very rigid and sturdy shape. Additionally it consists of quite thick walled tubes this also adds considerable strength at at a relatively low weight. Another benefit is it's very flat top surface which makes it very comfortable for whoever i carry on the back. I have some simple rubber straps for securing crates or other freight. There is one major drawback of this carrier is that if you use it for years or end or if you transport really heavy loads it tends to break at the welds.
As a result if have upgraded to the typically dutch 'Post
Man's' carrier. This one is quite a bit heavier but it just lasts and
lasts and is extremely strong.
Almost all other carriers i've seen suck the bag or are very
expensive.
For
some years now 'Ultra durable Swedish Army' Kronan bikes have become
more and more popular.
E 379, cheaper model
E 579,
expensive but better
Although i really like the way
these bikes were
marketed and the general idea behind them it must be said that in my
opinion they are not truly good bikes. Some
aspects of them are quite good, they are fairly durable but their major
flaw is their (by now) inflated price and the fact that most models are
Hideously
Heavy. I don't
mean they weigh a little or considerably more
than a random good bike either. I mean they often literally weigh about 70 % more
without being
stronger at all!! This is because the
frame, rims and
alloys used in the Kronan Klassik bike are severely outdated. A
major flaw as biking
them at slower speeds or with a headwind is very tiring because of high
inertia.
Another thing which would make
these bikes a lot more attractive would be better parts. The
makers/marketeers have
tried to save money and costs on some of the moving and thus essential
parts. Most Kronans don't have mountain bike rims but very old
fashioned, heavy and rust prone but strong normal rims. These factors
make these
bike less good and durable than they could have been.
Their most expensive model (with
gears) has
better parts and less drawbacks but is -in my opinion- definitely not
worth the
considerable expense.
Whenever you see a Kronan that has been in use for 2 years or more it invariably has quite a bit of rust and many parts. Unacceptable i think.
However if you
are looking for a strong and large front carrier the Kronan one (sold
separately for E 50) is second to none because unlike most others it
does not move
with the motion of your steering wheel. This means you retain your
balance.
If
you don't fancy the idea of building up your bike from scratch a very
good and cheaper (for what you get) alternative to a Kronan is the
'Perfect'
bikes assembled and sold by the Rotterdam
Bergman Bicycle Store.
http://www.bergman-fietsen.nl/
These bikes are very good and the people who sell them are very friendly. Personally i would like these bikes even better if the spokes, kick stand and back axle used were of an even better quality which is not to say that they are bad at all. Another benefit is that these bikes are all assembled at the store so there is quite some leeway in the parts you can have put on.
There are at least two other Brands of heavy duty bikes that i find way more interesting/better than Kronans: Azor and Monark (The Real Swedish Army Bike). These bikes are sold by the following very good (non-Rotterdam) stores:
If you are looking for service or parts rather than an entire bike i recommend the following Rotterdam Bike stores:
Very nice higher end parts, very
nice bikes and very good deals on good lock. If you are looking for
something special it is usually best to talk to the boss (guy with
glasses) some of the other staff is not as knowledgeable/service
orientated.
Philipsen: for some cheap parts and lots of patience/good advice affordable maintenance.
Oostzeedk 162-166
3063BK Rotterdam
Tel: 010-4143222
I am not thrilled at all about Allbikes (big store but mostly interested in selling not helping, boss is very nice but the pony tailed Grease Monkey called Marco can be a real unfriendly bastard).
The huge stores at Oostplein are also no good. Just trying to make a buck, misleading advertising, bad locks and some terrible bikes. In one of them there is this real fat red headed chap who can be real unfriendly and impatient. Not good.
The
Total cost of my bike is
as follows:
-A lot of time. This was spend learning (which i consider fun and
beneficial) and doing lots of tinkering and overhauling.
-About E 270 (this was accomplished through a lot of scavenging and a
few gifts)
The result is a bike that will greatly outperform (in every way)
any brand new bike that is E 500 or cheaper and most more
expensive ones too. Also my bike is (as i've said earlier) perfectly
suited to my needs. I wouldn't trade it for almost any other bike no
matter how high tech or expensive. In the long run it wouldn't be worth
it.
There is quite a lot more i
could say about my bike and bikes in general.
I might write some more as well as include more pictures in the
future. If you got questions just mail them to the rhizomes people.
-Mark
Additional Top Tips
1.
Find an old
school
bicycle store.
Before you rely on them for anything make sure they have a
knowledgeable, reliable, friendly and forthcoming staff. Treat them
with
respect because they deserve it and because
their advice can be priceless.
Far too many bicycle store staff have an annoying tendency to say that
what you
want or need does not exist or is 'impossible'. When what they
actually mean and should by rights be saying is: 'we
don't have it' and 'i don't feel like helping you out'.
Don't take this shit, voice your displeasure and simply go elsewhere.
In Dutch there is even a
byword for this mentality: 'fietsenmakers mentaliteit'.
There is a huge difference between a committed bicycle repairmen and a
greedy salesman that happens to work in a bike store. The latter are
low and
useless creatures the former are a wonderfull dying breed but can still
be found
in any city. Learn to spot the difference and then buy the real deal a
beer!
2.
Scavenge, trade and assimilate
(i don't mean steal!)
Pick up many old (mountain) bike wrecks take them home and take of the
very best parts to learn how they are mounted and to build up a
collection of (spare) parts for your ultimate bike.
My bike contains parts from at least five wrecks. Sometimes it is just
a small but necessary bolt you get and sometimes you get a great frame,
a
kick ass wheel, brake assemblies and more from a single "wreck".
3.
Maintenance, maintenance and
more maintenance.
With a good bike this will be minimal but crucial nonetheless.
4.
Upgrade and alter untill you
are very satisfied.
5.
Try out other people's bikes
for inspiration.
6.
Get an extremely good repair
guide and befriend a 'bike repair guru' if possible.
Alternatively or additionally rely on the bike sites i mentioned, they
are veritable treasure troves!
7. Buy all the basic tools (spanners, adjustable wrench, screwdrivers,
crank remover, pedal spanner, chain rivet tool, hex wrenches) and make
sure they are of decent quality.
 -A typical Chain
Rivet tool
-A typical Chain
Rivet tool
Top 5. Mess ups
By this i mean the biggest mistakes i have made with my cycling pursuits, in particular as far as maintenance and repair goes. I do believe that it is definately sometimes very good to make one's own mistake in order to best learn from them. Even so i hope some people at least won't have to make these annoying mistakes after reading about them.
1. The "Making it fit! / Bash it with a hammer!" approach!
This a the approach most inexperienced or impatient people take when trying to 'repair' a bike. On the first frame/bike i totally built up from scratch i did this with various components. All i will say is that trying to mount a saddle post that is even 0.1 mm bigger than the seat tube fit or trying to fit a way smaller saddle post is sheer folly. I almost completely destroyed my frame doing this!
I have a friend that had the 'bash' method as his preferred modus operandus for years. It meant he trashed a crank and 3 cog assembly on one very nice bike as well as totaled a very good Scot USA Frame when trying to remove a stuck seat post.
Most people however start out carefully but revert to these methods when they find themselves stumped and/or impatient. The latter two very often happen with stuck seat of steering posts, bolts, cranks etc. To learn many great methods to remove and replace these components without trashing them or your frame check out the following links.
Saddle post, the excellent Mr. Brown explains what to do on:
http://www.sheldonbrown.com/stuck-seatposts.html
Cranks,
http://www.utahmountainbiking.com/fix/crank.htm
http://www.sheldonbrown.com/tooltips/cotterless.html
Handle bar,
You will have to look on the internet yourself as i have not yet found a good link.
At this point i want to point out the existence of IMAL. This is a special rust dissolving and highly penetrating oil designed especially for dealing with stuck bolts, nuts and components. It is excellent and cheap stuff. If you use it it is very important to give it time to work -5 to 10 minutes- and let gravity do the work (position component or bike in such a way that the oil can really penetrate).
2. Crank/Crank extractor totaled # 1
When i first got my current frame i wanted to replace the old crank with a better one i had been given. I had no clue how to go about removing a crank! I had never heard of a crank extractor much less used one. Grima filled me in and lend me his extractor. I proceeded to screw it in crookedly which resulted in me stripping the cranks' as well as the extractors' thread!
This was the first time i had to saw through a destroyed crank in order to remove it.
Oh well. I bought Grima a new extractor (they are not that expensive) and i learned then and there that:
I should be careful when screwing in the extractor. These days i am very careful when i insert it, i make sure it turns in easily and goes in deep. If at any point it feels difficult i unscrew it and start over in order to make sure it is aligned well. I also often first clean the threads with a small brush and oil them. This also make it easier to screw the extractor in properly.
3. Axle Fubared
As you may have read i am a big fan of sturmey archer three speed hubs. I've been riding them for years now none the less i found something out about them only recently. This newfound knowledge turned out to be crucial. I found out that these hubs have rather specific axle thread which mean only specific nuts fit them properly!
I found this out because i mounted a wrong nut on them and completely destroyed my (essential) axle! I mounted a Torpedo nut instead of a Sturmey Archer nut. The result:
A E 1 component and a hapless oversight caused about E 70 worth of damage!! This is what a new axle and the quite involved repair would have cost had i let a bike shop fix it.
Instead i stripped a back-up hub that i had picked up of the street and reserved for just such a type of "catastrophe" and replaced the worn out axle. I was really thinking it would be a problem to fix my hub but when i got down to it (with lots of help from Grima) it turned out to be a fun and learning experience. It took me about two hours to replace the hub but in that time i got a new understanding and new appreciation for the beauty of hub gears! I took the opportunity to service the hub so it would run even better, and as a result next time around (probably not for a very long time, since these hubs are so low maintenance) i will know what do.
Anyway about the axle nut: on the side with the little chain one can recognize the proper Sturmey Archer nut because it has a small hole bored through it unlike it's Torpedo counterpart. As for the other side ask and make really sure you got the right one!
4. Crank totaled # 2
After fixing my axle i reckoned i might as well replace my entire drive assembly (it was quite worn out from about three years of constant and sometimes extreme biking). When i mounted the new axle i also replaced the back cog. So i bought i new chain and decided to but a new crank with removable front cog. I figured this would look nicer. I had completed the entire repair, done everything right when i realized to my horror that i had not put a washer between my new crank bolt and the aluminum crank. This meant the bolt had eaten into the crank (i had tightened it quite hard) and the bolt could no longer be removed.
I figured i would leave the whole thing and hope for the best. Within a few days what i had feared happened. My brand new crank assembly started working itself loose, i could feel and even hear the "play" on every down stroke of pedaling. This left me with only one option: to saw of my brand new crank! I had sawn of a crank once before and i remembered one must be very careful to not damage the axle or the bracket. This means no hard hammering or sawing too close to the axle!
It took me about 30 minutes but then i had it off and got myself another simple one piece crank/cog and had spend another 30 minutes mounting it.
So the net result of forgetting a E 0.20 cent washer: a destroyed brand new E 20 crank and a fair bit of work. Oh well i won't forget that again! :)
5. New headset and Front Fork completely wasted
This happened because i tried to mix and match Headsets. The result was my brand new components worth about E 50 being ruined within' 4 weeks. All i needed to know in order to prevent this horrible mess:
If necessary Philipsen bike store machines down a (replacement) front fork so they take standard threaded 1 Inch (26,4 * 30,2 mm) headsets rather than rare J.I.S. (27 * 30,2) headsets. So it would have paid very much to ask about this service in 6 rather than 4 stores (sometimes it is a real hunt).
Also never mix and match headsets particularly when they are of different size/types!